Wednesday, February 13, 2013

Valentine Oreos and Marshmallow Pops

I needed to make some cute goodies for Jada's 1st grade class. I browsed Pinterest and came across some cute ideas. I found a great recipe for heart shaped homemade oreos. I have made something similar before (Homemade Oreos) from devil's food cake, and I thought this was just as easy and cute! I wanted to have one more cute little treat though. I remembered making hundreds of marshmallow pops for my sister-in-laws wedding a few years ago, and thought that would be great! I already had candy melts in the closet and only needed to buy a pack of corn skewers. 

Making a million blue marshmallow pops...

Making marshmallow pops is very simple. The kids can help out, and it's a very versatile treat. You can use an array of colors to match almost ANY event! I use the Wilton's candy melts. They come in tons of colors, and are for sale at Walmart, Kroger, Michaels... almost anywhere!


Here is what the bag looks like

 Now, the instructions for melting them are on the bag. Follow the instructions!  A few little tips to help out: 1- NEVER add water! If it's too thick, dilute it with a tablespoon of vegetable oil. 2-If you are mixing to make colors, start with white! Then add in your other colors. And trust me, a little goes a long way! If you need pink, only put 5-6 red in the whole bag of white. 3-If the chocolate starts to harden as you work and no longer seems to be coating as well, pop it back in the microwave! These melts are awesome for making chocolate pops as well. I made owl pops for Kennedy birthday. It was so easy, and made a great thank you gift for our guests. You can buy molds for almost any occasion! I found the owl mold on eBay for less than $2.00


Now, onto the recipes! The first will be for the super cute Valentine Oreos!

Valentine Home-made Oreo's
1 box strawberry cake mix
2 eggs
3/4 cup melted Crisco
*One container of icing will be needed to put in the middle of the hearts.

Mix all ingredients together. The batter will be very thick. You will need to roll out small balls with the dough, so you don't want it soupy. Spray your pan with Pam. Roll two small balls out. Lay them together on the pan, and pinch the bottoms to make a heart shape. Continue rolling our small balls and pinching them together at the bottom until all dough is used. Make sure you end up with an even number. Bake at 350 degrees for 8-10 mins. Do not cook more than 10 mins. When you pull the pan out of the oven, let it slam hard on the counter to help flatten out the cookies. When the cookies have completely cooled, they are ready to be frosted. Fill a zip bag with frosting of your choice. Cut a small hole in one corner of the bag. Pip icing onto one cookie. Find a cookie similar in size and sandwich the two together. Allow to air dry for an hour before storing in container.

Mix ingredients.

Place 2 small balls on pan and pinch the bottom together.

It should look like this.


Allow cookies to cool completely.

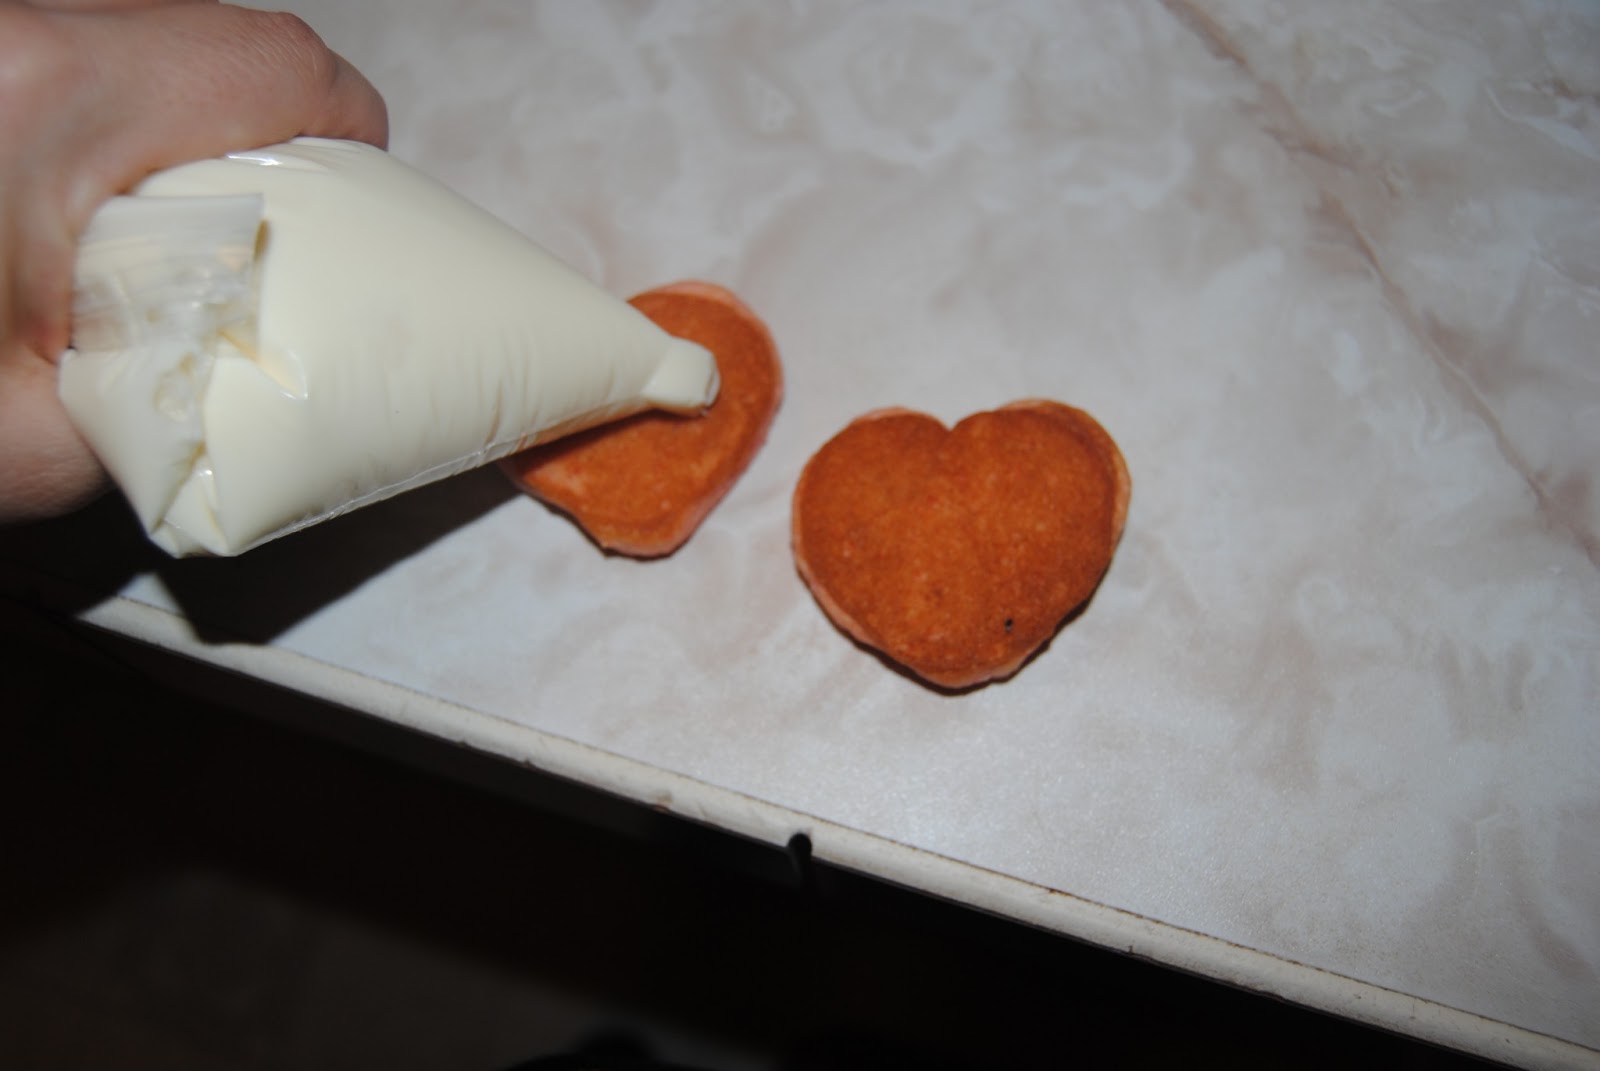
Pipe on icing and sandwich together.

So cute!


Marshmallow Pops:
Large Marshmallows
Wilton's Candy Melts 
Pop sticks (Wilton's Sticks, Popsicle Sticks, Corn Skewer sticks...)
Wax Paper sprayed with Pam
Sprinkles.

Place sticks into marshmallows. Lay out wax paper onto counter and spray with non-stick cooking spray. Pour sprinkles into a small, shallow bowl. Melt chocolates in microwave according to package. Take marshmallows and dip and turn into chocolate. Only cover half of the marshmallow. Immediately dab the pop into the sprinkles and place onto wax paper to cool. Store in an airtight container or large zipbag.

Place marshmallows on the sticks.

Melt chocolate.


Quickly swirl the sticks in the melted chocolate.

Dip in the sprinkles.

Place on wax paper to cool.


All done!


Monday, February 11, 2013

Chocolate Scotcheroos

Maggie got a Rice Crispy Treat Cookbook for Christmas from her Mema. I kid you not, this child has been begging for me to buy the ingredients to make some of the recipes in it for weeks! So, we picked out one to try and I bought the items we needed to make it. She was so excited when she came home from school! She was dying to make them! They were fairly easy to make and very delicious! This will make a great snack for the 6 hungry monsters that get off the bus everyday after school at my house!


Chocolate Scotcheroos:
6 cups Rice Crispies
1 cup corn syrup
1 cup sugar
1 cup peanut butter
1 cup chocolate chips
1 cup butterscotch chips

Melt corn syrup and sugar over medium heat. Add in peanut butter. Stir until well mixed. Add in Rice Crispies and stir to coat well. Press into a greased 9x12 dish. Melt chocolate and butterscotch chips over low heat. Pour on top of Rice Crispies. Allow time to cool and harden. Makes 24. 
Calorie Count: 260 calories per square


Measuring out the Rice Crispy's


Cooking the corn syrup and sugar.


Add in the peanut butter.


Mix in the Rice Crispy's


Pour in the dish.


Spread out and press down into dish.


Melt chips in microwave or on stove-top.


Pour melted chips on top.


Spread out with spatula.


Allow to cool, cut and enjoy!


Saturday, February 09, 2013

Weight Loss

Ok, so I have really been wanting to do a blog about weight loss. Although I lost a large amount of weight during my pregnancy with Kennedy, I have also lost about 20 pounds in the last year. I hope this inspires someone to take control of their health, or encourages you to KEEP on!! 


Everyone I know is watching what they eat I feel like. And it seems as though they are all using different methods. I don't think any method is right or wrong. I feel like you should do whatever works for you! Not all methods will for everyone, that's for sure!


I have tried several diets over the years, and the only common denominator in my success is JOURNALING! By journaling, I simply mean keeping up with what I ate by writing it down or typing it in. I understand that this method might not work for others, but I am hoping it will help someone! In the past, I used Weight Watchers (WW). WW uses a points system. Each food is worth a certain amounts of points. You get a set number of points to use everyday. Exercise is also assigned points, points that you can add back in. This is a wonderful system! But it can be costly. I do love WW though, and I have lost quite a bit of weight using the points system.


 Some of the other diets I have heard about, and even tried include Paleo, Clean Eating, Low Carb... all of which are high protein, low carbohydrate, and no grain type diets. These don't work for me. I need no limits on what I can eat. I like to be able to eat whatever type of food I want. I have however found a plan which I am absolutely LOVING! I have been on this plan for 30 days. I have lost 8 pounds! That's 2 pounds a week, which is fantastic! I wanted to share about this new diet and how well it works in hopes of encouraging others!


The new plan I have found and absolutely love is called "My Fitness Pal." It is website as well as a phone app (available on Apple and Android). www.MyFitnessPal.com It helps you figure the amount of calories you need everyday. It has the nutritional information for almost ANY food. You can easily find the calories via a search or by simply scanning the bar code! You can even add all the ingredients of your recipe and come up with the exact amount of calories in your own personal dish! 


With My Fitness Pal, you can log your exercise as well! It will quickly help you add back in the calories for almost any exercise you can think of! And what the best thing about this app/website is?? It is totally FREE!!! While I love Weight Watchers, it is very similar to this program, it is just to costly! It is nice to meet with others each week on Weight Watchers as well, but My Fitness Pal has it's own buddy system too! It has a daily news feed where you can post your workouts, weight loss and food diary's. You can find friends from Facebook and comment and encourage each other along the way! I love it! 
Now, I decided to do this post to encourage anyone who is thinking about jumping on the health train to go ahead and get started! No excuse not too with this program. It's free. It's extensive. It even has the friends and encouragement factor covered! 
As you may have noticed, I have filled this post with old pics. I did that to show you how far I have come! And to remind myself to never go back there! And to complete my post, I will post some now pics. I hope you find it as encouraging as I do. Please feel free to email me or add me as a friend on My Fitness Pal! jennifer_l_hawkins@yahoo.com


I have taken up running. I started running last May, and I love it! It's a great way to get exercise and it's something I truly enjoy. I encourage everyone to search and look and don't quit until you find an exercise that you love! Don't force yourself to do exercises you hate! You will end up quitting. Look until you find something you enjoy. For me, it's running! Like my outfit? 


Total weight loss: 70 pounds!
I also want to link you to another blog I posted about weight loss a few months ago: http://thehawkinsfamilyblog.blogspot.com/2012/09/weight-loss-journey.html

Friday, February 08, 2013

Chicken and Green Bean Casserole

Ok, I will admit it. I am a HUGE Rachael Ray fan. As in.. I DVR the show every morning and watch it after I run everyday (while Kennedy is napping). I usually don't miss it. My Nana used to watch it as well. We would hash out the show everyday after it! So, this week on the show, Rachael had casserole week. I had never thought of putting chicken into green bean casserole. I was so excited. Also among this recipe- homemade cream of mushroom soup and cheese. Now we are talking! Okay, now onto the recipe! It was truly delicious. I will link you to the RR version, and then show you mine. I also made a special dairy free version for my sister. I will add in the recipe the dairy-free changes.


Chicken and Green Bean Casserole:
2 cans Green Beans
2 Cups Chicken shredded
1.5 cans of Cans chicken stock  (2 if you leave out cream)
3/4 cup heavy cream (I left this out for the dairy free)
Salt
Pepper
8 oz. container of mushrooms (I use button)
4-6 cloves garlic minced
4 tablespoons Butter (I substituted Crisco here for the dairy free)
2 tablespoons olive oil
1/2 cup flour (may need more depending on how thick it gets)
3/4 cup cheese ( I used shredded mozzarella)
1 Large can french fried onion topping

Saute mushrooms in butter and olive oil for 5-7 mins. Add in minced garlic, salt and pepper. Stir in 1/2 cup flour until incorporated. Slowly whisk in chicken stock. Cook until bubbly and thick on med heat. Slowly pour in heavy cream. Continue cooking 2-3 more mins until thick and creamy. Add in shredded chicken and green beans. Mix well and put into casserole dish. Cook at 375 degrees for 30 mins until bubbly. Put topping on and place back in oven an additional 5 mins until topping is heated.

Original Recipe:
http://www.rachaelrayshow.com/food/recipes/chicken-and-green-bean-casserole/


Saute mushrooms and garlic in oil and butter.


Mix in flour until incorporated.


Whisk in chicken broth.


Whisk in cream.


Add in green beans.


Add in chicken.


Pour in casserole dish and bake at 375 for 30 mins.


Add onion topping and cook an additional 5 mins.


Wednesday, February 06, 2013

The Duggar's "Chicken in a Biscuit"

I love the Duggar Family. For those of you who don't know them, they have a show on TLC called 19 Kids and Counting. They are a Godly family with Godly principles and all though they are a more "modest" family than I a have, I have the utmost respect for them. They are walking the way the Lord has told them too, and abiding in Him! I have been wanting to try this recipe for a while, and when I stumbled upon it on Pinterest I decided to give it a try. It was very easy and very good! The only change I will make next time will be to add some cream cheese to the mix inside the chicken biscuits. 


Chicken in Biscuits:
1 can crescent rolls
1 can cream of chicken soup (plus 1 can milk)
1 10 oz. can of chicken (or shred your own)
1 cup shredded cheddar cheese


In large mixing bowl combine cream of chicken soup with milk, until it is gravy consistency (set aside)
In a different bowl combine cheese and shredded chicken. (Break up chicken with fork or fingers until finely shredded). Spray dish with Pam. Pour small amount of gravy in bottom of 9X13 baking dish. (Just enough gravy for biscuits not to stick to bottom). Now one by one separate crescent rolls and flatten with fingers until thin but with no holes. Fill crescent with chicken and cheese mixture (palm full of mix) and wrap tightly in crescent roll. Finally pour  gravy over top and bake for 40-45 mins at 350 degrees.


Make the gravy with milk and cream of chicken.


Pour a little on the bottom of dish.


Mix chicken and cheese. This is where I will be adding in cream cheese next time.


Scoop a small ball of chicken and place in crescent.


Roll them up!


Place them in your dish.


Pour remaining gravy on top.


Bake 30-45 mins.


Enjoy!


Bighorn 100

           This was my 8th attempt at a 100 mile buckle. I love the 100 mile race- it pushes every ounce of physical and mental strength I h...