Monday, October 29, 2012

Southern Collard Greens!

I'm sure this recipe will not be quite as popular as others, but here we go! I actually love collard greens! My sister does too. So I tried my hand at a Paula Dean version. We both REALLY liked this recipe and decided that we would use this one from now on! 

Collard Greens
ease **** taste ****


1 large bag of chopped collard greens 
1 tablespoon season salt 
1 tablespoon House Season (see recipe below)
1/2 lb smoked meat (ham hocks, smoked turkey wings, or smoked neck bones) 
1 tablespoon butter

House Season-

  • 1 cup salt
  • 1/4 cup black pepper
  • 1/4 cup garlic powder
  • Store in an airtight container for up to 6 months


Bring 3 quarts of water to a boil. Add season salt and ham hocks. Reduce heat to medium-low and cook for 1 hour. Remove the large stems from the bag of collards. Add the entire bag of greens and the butter. Cook for an hour or until tender. You can also use a fresh bunch of collards as well. Just wash them well, strip the leaves from the stalk and roll up and chop. I just chose the lazy route for this batch! I actually let mine cook 2 hours on simmer with the lid on.

'

 Boil water and ham first for 1 hour.


Add the greens and cook for at least 1 hour more,


Almost done!!


Parmesan Crusted Cod

This is a really quick and easy way to serve cod. Tilapia, flounder or any other mild fish would work well here too! Just use your favorite fish. 


I wasn't a huge fan of this recipe, but my husband and my son really liked it! I will cook this again, however next time I will cook it on my broiler pan, and let it cook another 5 mins.

Parmesan Crusted Cod:
Ease ***** Taste ***

3/4 cup freshly grated Parmesan cheese
2 teaspoons paprika
1 tablespoon chopped flat-leaf parsley
4 fish fillets (about 1 pound total)

Combine ingredients in shallow pan, and coat fish on both sides. Cook 10-12 mins at 400 degrees, or until fish is done.


Cover the fish in mixture.


Before the oven.


After the baking!


Wednesday, October 24, 2012

Crock Pot Whole Chicken

This is probably the easiest recipe you will ever come across! There are several ways to do it, but every time, you end up with delicious chicken! The basic recipe is to cook a whole fryer chicken in the crockpot. One version is as follows:

Whole fryer chicken
4 potatoes, washed and wrapped in tin foil
salt/pepper
Place wrapped potatoes in the bottom of the crock pot. Place whole chicken on top. Sprinkle with salt and pepper. Cook on low 7-8 hours in the crockpot.

I have made that version many times, but I tried this a few nights ago and loved it! With this next recipe, not only can you eat off the chicken for several days, but you end up with a great chicken broth to freeze and use again!

Whole fryer chicken
8 sm red potatoes
1 bag of mini baby carrots
1 can chick broth
poultry season

Make sure to remove the giblet pack from inside the bird. I wash the bird off as well. Place the chicken in the crockpot. Pour in one can of chicken broth. Add the bag of carrots and the potatoes. Sprinkle the bird with whatever season you like. I used poultry season. I have used lemon pepper, just salt and pepper, season salt.. whatever you like! Place the lid on and cook for 7-8 hours on low. When done, remove the bird and veggies. The chicken will fall apart, so remove it carefully. Pour your stock water into freezer containers for later, or save it for rice to go with your chicken! The possibilities are endless! We usually pull the chicken off the bone and eat it with the veggies for dinner. I save the leftover chicken for chicken salad, chicken sandwiches, wraps, or on top of salads! 


Candy Apple How-To

Candy apples are a fall favorite for most I think. Especially for my kids! My sister and I have made candy apples multiple times and have learned quite a few tricks over the years. We use a regular box of candy apple mix from the grocery store and follow the directions carefully. When you're done, the trouble is well worth it!


10 apples
1 box of candy apple mix
tin foil
plastic wrap ribbon
no stick cooking spray
1 /4 teaspoon of crisco
2 1/2 cups sugar
1 cup water
candy thermometer

Follow the directions on the box.  Put sugar, apple mix, and water into pot . Bring to a boil. Then continue cooking on med-high until the mixture reaches about 300 degrees, known on the thermometer as the hard crack stage. This takes anywhere from 12 to 15 mins depending on the humidity. While the candy is cooking, put sticks in apples (this comes in the candy apple kit). Line the counter with tin foil and spray heavily with non stick spray. Do not use wax paper. The apples will stick. Make sure the apples and washed and dried completely. Wet apples will not work. Make sure there is no wax on your apples. The candy will not stick. Once the candy has reached hard crack, you will need to work very quickly. The candy will begin cooling immediately.  Remove your pan from the heat and quickly start dipping the apples. Hold the pan in one hand , tilted, and use the other hand to dip apples. You will need to turn the apple in a circle to fully coat it. Quickly stand it straight up on the foil and move on. By the last apple, the mix will be getting gooey so work quickly. Pour any leftovers on the tin foil to harden for the kids to eat! When the apples are cool (20 mins or so), wrap them in plastic wrap and tie a ribbon around the top! Store in a cool, dry place. They will only keep for 2-3 days. The color of the apples skin will appear brown under the candy. When you get done, you will need to clean your pan and thermometer. Fill your pot all the way to the top with water (like to the brim). Bring water almost to a boil. Use a wet rag to clean off the sides, and the hot water will dissolve the mix from the inside. Dip the candy thermometer in the boiling water to clean it. Enjoy the apples!!


Place mix, water and sugar in pan.


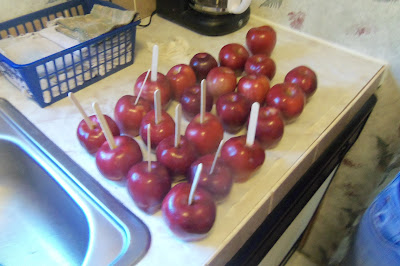
Put a popsicle stick in each apple.


Cook candy until it reaches the hard crack stage.


Quickly dip apples into mix!


Use plastic wrap and ribbons to finish up!


Enjoy!


Saturday, October 20, 2012

Easy Hibachi Dinner Night

My family loves Japanese Hibachi! We love to go to Kobe Steakhouse and enjoy the delicious fried rice, shrimp and steak! The thing we do not enjoy is the price! Hibachi can be very pricey for a family of 6. This led to a massive world wide web search to find the best tips, ideas and recipes for Japanese fried rice! Well, after some research, I discovered several good recipes and techniques to achieve the perfect dinner! I was also enlighted to the fact that this is the "American Version of Japanese Food" and not true, authentic Japanese (which I kind of figured!), but none the less... here is what I learned, and let me go ahead and tell you it was A.M.A.Z.I.NG.

Important Tips:

You must cook things in order. First, cook your veggies. Plate and put in oven on warm. Next, cook your meat (not quite done, but just about), then you want to cook your eggs for rice, and last your rice. Then bring it all back together at the end in the pan and finish cooking.

You must use day old rice. It affects your fried rice negatively to use just cooked rice. There is too much moisture and it won't cook right.

You want your skillet very, very hot. Don't add your rice or meat until the skillet is piping hot. You want it to sizzle!

Don't over stir the rice. Because you are using a pan, and not a big industrial grill, you won't have as much heat, so there is no need to stir repeatedly. Let is sit and cook before you stir.


Fried Rice, Shrimp and Veggies:
Ease: *** Taste: *****

4-6 cups of leftover cooked rice
3 eggs
1-2 zuccini chopped
1-2 squash chopped
35-40 raw, peeled, tail off shrimp
olive oil
sesame seed oil (available in the ethnic food section)
soy sauce
coarse kosher salt


Cook the veggies first. Add a tablespoon of olive oil to pan. Heat up pan to med-high on stove. Add sliced veggies and some salt. Add in a splash of sesame seed oil and of soy sauce. Cook for 5-6 mins until veggies are tender to your liking. Remove veggies and place in oven on warm. Heat your skillet back up with another tablespoon of olive oil. Add your shrimp. Add salt, pepper, a splash of soy sauce and a splash of sesame seed oil. (I used about a teaspoon of each for the splash). Cook for 3-5 mins until just about done. Remove from pan, and place in oven to keep warm. Return skillet to heat, add 3 eggs. Allow eggs to cook. When the eggs are fried, chop them up with your spatula. When eggs are done, place on a plate and keep warm in the oven. Last, you want to cook your rice. Add another splash of olive oil, and get pan nice and hot. You want to cook the rice on med-high. Be patient. Make sure you give the rice time to fry before you flip it over. I put a lot of rice in my skillet at once. It took about 10-12 mins to get it cooked. After rice is fried to your liking, add 1-2 teaspoons of sesame seed oil and of the soy sauce. Add salt if needed. Mix in the oil and soy sauce well. Taste to see if you need more. I had to add a little soy sauce to mine. You want to get your rice a brown color. When its done, add in your fried eggs and stir. You can now add your veggies and shrimp in as well (or keep them separate). And if you have not figured it out yet, we are an onion free family! So, please feel free to add onions to your veggies as well!


Frying up the veggies.


Finished veggies!


Shrimp cooking.

Finished shrimp/


Eggs.


Fried egg.


Starting on the rice.


Finished fried rice!

Wednesday, October 17, 2012

Fried Salmon Patties

This is very special recipe to me. I have been enjoying fried salmon patties since I was a little girl! My mother cooked them for me, as well as my Nana! We usually serve them with biscuits! I think of salmon and biscuits is one of my very favorite meals. I have continued the tradition on with my kids as well. We often dip our salmon in a side of Cane Patch Syrup! Salmon and biscuits are at their very best with a big dip in cane syrup! That's about as southern as one can get I suppose. None the less, I would love to share this family recipe with you too!


Fried Salmon Patties:
Ease: ***** Taste: *****

1 Can of Pink Salmon
1 egg
1/2 cup SR Flour
1/2 cup SR cornmeal
1/4 tsp garlic salt
1/4 pepper

Mix can of salmon (including the juice in the can) with all ingredients. Stir well until everything is mixed. Preheat oil to 350 degrees. Drop spoonfuls of the salmon mix into the grease and cook 3-5 mins until golden brown. 


Drop salmon by spoonfuls into the hot oil.


Fry 3-5 mins until brown.


Try them with syrup! Enjoy!

Sunday, October 14, 2012

Fall Break

I thought I would take a minute to share with everyone how we spent our fall break! Well, we had originally planned on a road trip for fall break! But after adding up the miles and the cost, and the time spent in the car alone with my 4 children... I changed my mind! I decided to keep it simple, restful and cheap! We started our week off with a pumpkin scavenger hunt at Mema's house! Me and my sister carefully thought out clues for each child. We strategically placed 7 pumpkins and clues all over Mema and Papa's land! Even little Kennedy got to find her pumpkin! The clue to find the pumpkin would only be given if you answered your "question" correctly. For example, Manny's question was "what season is it?" Of course, the questions got harder as the kids got older. Carter had to answer a science question about refracting and reflecting telescopes. We tried to base the questions on what they were all learning in school.


Kennedy found her pumpkin in the bird bath.

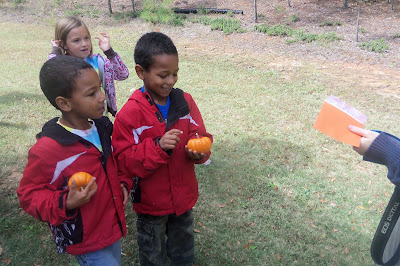
The boys with their pumpkins!


Jada found hers!


T.J. and his!


Maggie's pumpkin!


Reading clues and answering questions!


Pumpkin pose :)


Carter and his pumpkin.

After we found the all the pumpkins, we painted them! All the pumpkins turned out sooo cute! We even added a little glitter.


Kennedy painting her pumpkin.


Carter painted an Atlanta Falcons pumpkin.


Manny's


TJ made a face on his.


JJ's


Jada turned his into a vampire pumpkin.


Maggie made a fall tree on her pumpkin.

We had a wonderful time finding the pumpkins, eating lunch, painting the pumpkins and watching a movie at Mema's house! We also enjoyed several other activities over the week. We played outside everyday, riding scooters and shooting basketball. Played Just Dance on Wii until our legs hurt! And so much more...


We painted fall pictures on the front porch. This is Maggie and Jada's beautiful fall pictures!


We had a special dinner date night with the family at the kids favorite restaurant, Kobe Japanese Steakhouse. 


We took a dip in the hot tub one cool morning and had hot chocolate and apple cider at Niece's house. 


We took a trip to the Griffin fair.


We also enjoyed our Fall Festival at church!


Kennedy enjoyed the Fall Festival too.

Well, I think that about covers it! We tried to stay busy and have fun and enjoy some fall activities.  I hate that fall break is over and that the kids have to go back to school tomorrow. I am glad to have a little down time though. I miss them during the day! I will just look forward to our next break, which is right around the corner! 


Pinhoti 100, Round 2

I towed the line of my 10th 100 miler this past Saturday morning. This was the only 100 mile race I did this year, despite the fact that I l...